在我们的日常工作中,经常会用到Spring、Spring Boot、Spring Cloud、Struts、Mybatis、Hibernate等开源框架,有了这些框架的诞生,平时的开发工作量也是变得越来越轻松,我们用 Spring Boot 分分钟可以新建一个Web项目。
记得自己刚开始工作的时候还是在用Servlet写Web项目,自己写数据库连接池,用原生JDBC操作数据库,好了不发散了。回到这篇文章的主题,今天通过手写Spring框架,帮大家深入了解一下Spring的工作机制,文中涉及的代码只用来帮助大家理解Spring,不会在线上使用,有不严谨的地方还请大家掠过。
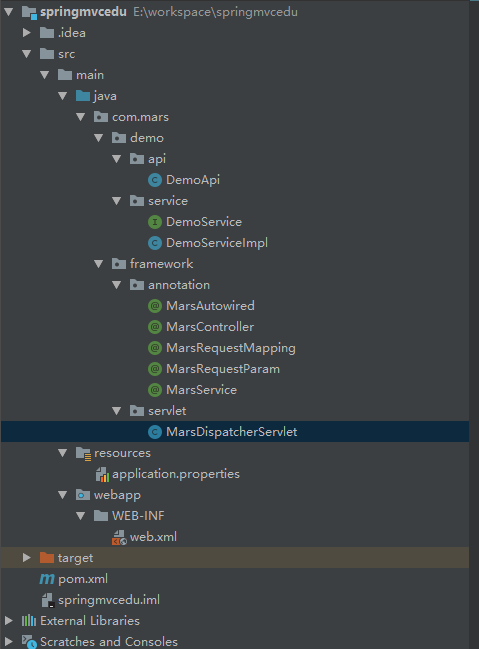
项目结构
![]()
框架部分实现
- 为了区分框架部分代码和业务部分代码,我们将这两部分分别划分在不同的包内
com.mars.demo 和 com.mars.framework,以便随后只扫描业务代码。 - 这里是自己手写Spring框架,所以不会引入任何Spring项目相关的包。
- 由于是一个Web项目,所有我们需要引入
servlet-api 包,仅供编译器使用,所有配置 scope 为 provided。
新建一个Servlet
首先新建一个 HttpServlet 的实现类 MarsDispatcherServlet,用来接收请求。
1
2
3
4
5
6
7
8
9
10
11
12
13
14
15
16
17
| public class MarsDispatcherServlet extends HttpServlet {
@Override
protected void doGet(HttpServletRequest req, HttpServletResponse resp) throws ServletException, IOException {
this.doPost(req, resp);
}
@Override
protected void doPost(HttpServletRequest req, HttpServletResponse resp) throws ServletException, IOException {
}
@Override
public void init(ServletConfig config) throws ServletException {
}
|
配置web.xml
1
2
3
4
5
6
7
8
9
10
11
12
13
14
15
16
17
18
19
20
21
22
| <!DOCTYPE web-app PUBLIC "-//Sun Microsystems, Inc.//DTD Web Application 2.3//EN"
"http://java.sun.com/dtd/web-app_2_3.dtd" >
<web-app>
<display-name>Spring Mvc Education</display-name>
<servlet>
<servlet-name>marsmvc</servlet-name>
<servlet-class>com.mars.framework.servlet.MarsDispatcherServlet</servlet-class>
<init-param>
<param-name>contextConfigLocation</param-name>
<param-value>application.properties</param-value>
</init-param>
<load-on-startup>1</load-on-startup>
</servlet>
<servlet-mapping>
<servlet-name>marsmvc</servlet-name>
<url-pattern>/*</url-pattern>
</servlet-mapping>
</web-app>
|
- 首先配置了一个 servlet, 名字是 marsmvc, 类全路径是
com.mars.framework.servlet.MarsDispatcherServlet。 - 设置了初始化参数名和值(这里的值是整个项目的配置文件)。
- 配置
load-on-startup, 标记容器是否在启动的时候就加载这个servlet(实例化并调用其init()方法)。 - 配置
servlet-mapping, 将所有请求转发到这个servlet处理。
配置application.properties
1
| scanPackage=com.mars.demo
|
这个比较好理解,仅配置了一项内容,意思是要扫描的包,随后我们会获取这个值去加载容器。
定义我们常用的注解
- MarsAutowired
- MarsController
- MarsRequestMapping
- MarsRequestParam
- MarsService
这里仅列举两个,其他都大同小异,需要源码的可以去我的代码仓库fork。
1
2
3
4
5
6
| @Target({ElementType.TYPE})
@Retention(RetentionPolicy.RUNTIME)
@Documented
public @interface MarsController {
String value() default "";
}
|
1
2
3
4
5
6
| @Target({ElementType.TYPE, ElementType.METHOD})
@Retention(RetentionPolicy.RUNTIME)
@Documented
public @interface MarsRequestMapping {
String value() default "";
}
|
充实Servlet功能
先列出框架在初始化的时候都要做那些事情
- 加载配置文件
- 扫描所有相关联的类
- 初始化所有相关联的类,并且将其保存在IOC容器里面
- 执行依赖注入(把加了@Autowired注解的字段赋值)
- 构造HandlerMapping,将URL和Method进行关联
接下来我们一步步完成上面的操作
1
2
3
4
5
6
7
8
9
10
11
12
13
14
15
16
17
18
19
20
21
22
23
| @Override
public void init(ServletConfig config) throws ServletException {
System.out.println("===================");
doLoadConfig(config.getInitParameter("contextConfigLocation"));
doScanner(contextConfig.getProperty("scanPackage"));
doInstance();
doAutowired();
initHandlerMapping();
System.out.println("Mars MVC framework initialized");
}
|
加载配置文件
1
2
3
4
5
6
7
8
9
10
11
12
13
14
15
16
17
18
19
| private Properties contextConfig = new Properties();
private void doLoadConfig(String location) {
InputStream inputStream = this.getClass().getClassLoader().getResourceAsStream(location);
try {
contextConfig.load(inputStream);
} catch (IOException e) {
e.printStackTrace();
} finally {
if (inputStream != null) {
try {
inputStream.close();
} catch (IOException e) {
e.printStackTrace();
}
}
}
}
|
扫描所有相关联的类
1
2
3
4
5
6
7
8
9
10
11
12
13
14
15
16
17
18
19
20
| private void doScanner(String basePackage) {
URL url = this.getClass().getClassLoader().getResource("/" + basePackage.replaceAll("\\.", "/"));
File dir = new File(url.getFile());
for(File file: dir.listFiles()) {
if(file.isDirectory()){
doScanner(basePackage + "." + file.getName());
} else {
String className = basePackage + "." + file.getName().replace(".class", "");
classNames.add(className);
System.out.println(className);
}
}
}
|
初始化所有相关联的类,并且将其保存在IOC容器里面
1
2
3
4
5
6
7
8
9
10
11
12
13
14
15
16
17
18
19
20
21
22
23
24
25
26
27
28
29
30
31
32
33
34
35
36
37
38
39
40
41
42
43
44
45
46
47
48
49
50
51
52
53
54
55
| private void doInstance() {
if(classNames.isEmpty()) return;
for(String className: classNames) {
try {
Class<?> clazz = Class.forName(className);
if(clazz.isAnnotationPresent(MarsController.class)) {
Object instance = clazz.newInstance();
String beanName = lowerFirstCase(clazz.getSimpleName());
ioc.put(beanName, instance);
} else if (clazz.isAnnotationPresent(MarsService.class)) {
MarsService service = clazz.getAnnotation(MarsService.class);
String beanName = service.value();
if("".equals(beanName.trim())) {
beanName = lowerFirstCase(clazz.getSimpleName());
}
Object instance = clazz.newInstance();
ioc.put(beanName, instance);
Class<?> [] interfaces = clazz.getInterfaces();
for(Class<?> inter: interfaces) {
ioc.put(inter.getName(), instance);
}
}
} catch (Exception e) {
e.printStackTrace();
}
}
}
private String lowerFirstCase(String str) {
char[] chars = str.toCharArray();
chars[0] += 32;
return String.valueOf(chars);
}
|
执行依赖注入(把加了@Autowired注解的字段赋值)
1
2
3
4
5
6
7
8
9
10
11
12
13
14
15
16
17
18
19
20
21
22
23
24
25
26
27
28
29
30
31
32
| private void doAutowired() {
if(ioc.isEmpty()) return;
for(Map.Entry<String, Object> entry: ioc.entrySet()) {
Field[] fields = entry.getValue().getClass().getDeclaredFields();
for(Field field : fields) {
if(!field.isAnnotationPresent(MarsAutowired.class)) continue;
MarsAutowired autowired = field.getAnnotation(MarsAutowired.class);
String beanName = autowired.value();
if("".equals(beanName)) {
beanName = field.getType().getName();
}
field.setAccessible(true);
try {
field.set(entry.getValue(), ioc.get(beanName));
} catch (IllegalAccessException e) {
e.printStackTrace();
}
}
}
}
|
构造HandlerMapping,将URL和Method进行关联
1
2
3
4
5
6
7
8
9
10
11
12
13
14
15
16
17
18
19
20
21
22
23
24
25
26
27
28
29
30
31
32
33
34
35
| private void initHandlerMapping() {
if(ioc.isEmpty()) return;
for(Map.Entry<String, Object> entry : ioc.entrySet()) {
Class<?> clazz = entry.getValue().getClass();
if(!clazz.isAnnotationPresent(MarsController.class)) continue;
String baseUrl = "";
if(clazz.isAnnotationPresent(MarsRequestMapping.class)) {
MarsRequestMapping requestMapping = clazz.getAnnotation(MarsRequestMapping.class);
baseUrl = requestMapping.value();
}
Method[] methods = clazz.getMethods();
for(Method method : methods) {
if(!method.isAnnotationPresent(MarsRequestMapping.class)) continue;
MarsRequestMapping requestMapping = method.getAnnotation(MarsRequestMapping.class);
String regex = requestMapping.value();
regex = (baseUrl + regex).replaceAll("/+", "/");
Pattern pattern = Pattern.compile(regex);
handlerMapping.add(new Handler(entry.getValue(), method, pattern));
System.out.println("Mapping: " + regex + "," + method.getName());
}
}
}
|
编写业务代码
新建一个Controller
1
2
3
4
5
6
7
8
9
10
11
12
13
14
15
16
17
18
19
20
21
22
23
24
25
26
27
28
29
30
31
32
33
| @MarsController
@MarsRequestMapping("/demo")
public class DemoApi {
@MarsAutowired
private DemoService demoService;
@MarsRequestMapping("/query")
public void query(HttpServletRequest req,
HttpServletResponse resp,
@MarsRequestParam("name") String name) {
System.out.println("name: " + name);
String result = demoService.get(name);
try{
resp.getWriter().write(result);
} catch (IOException e) {
e.printStackTrace();
}
}
@MarsRequestMapping("/add")
public void add(HttpServletRequest req,
HttpServletResponse resp,
@MarsRequestParam("a") Integer a,
@MarsRequestParam("b") Integer b) {
try {
resp.getWriter().write(String.format("%d+%d=%d", a, b, (a+b)));
} catch (IOException e) {
e.printStackTrace();
}
}
}
|
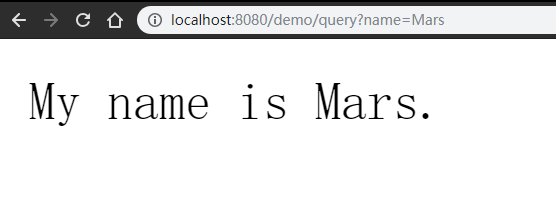
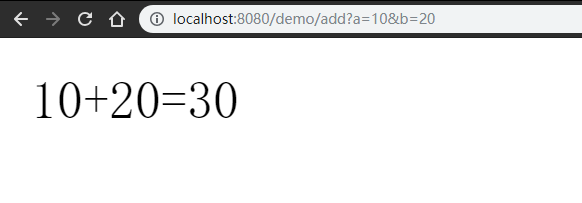
提供两个接口,一个通过请求名称返回响应的介绍内容,另一个将请求的两个Integer相加并返回。
创建一个Service
1
2
3
4
5
6
7
8
9
10
| public interface DemoService {
String get(String name);
}
@MarsService
public class DemoServiceImpl implements DemoService {
public String get(String name) {
return String.format("My name is %s.", name);
}
}
|
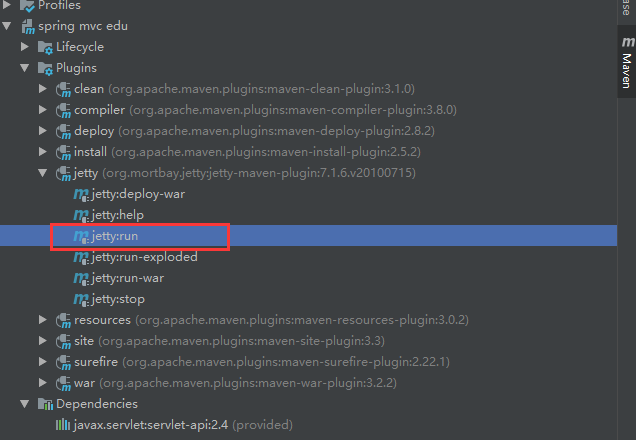
添加Jetty插件
我们的项目运行在Jetty中,所以添加相关插件以及配置:
1
2
3
4
5
6
7
8
9
10
11
12
13
14
15
16
17
18
19
| <plugin>
<groupId>org.mortbay.jetty</groupId>
<artifactId>jetty-maven-plugin</artifactId>
<version>7.1.6.v20100715</version>
<configuration>
<stopPort>9988</stopPort>
<stopKey>foo</stopKey>
<scanIntervalSeconds>5</scanIntervalSeconds>
<connectors>
<connector implementation="org.eclipse.jetty.server.nio.SelectChannelConnector">
<port>8080</port>
<maxIdleTime>60000</maxIdleTime>
</connector>
</connectors>
<webAppConfig>
<contextPath>/</contextPath>
</webAppConfig>
</configuration>
</plugin>
|
运行
![]()
点击 jetty:run 运行项目
浏览器访问: http://localhost:8080/demo/query?name=Mars
![]()
浏览器访问:http://localhost:8080/demo/add?a=10&b=20
![]()
仓库地址